Notice
Recent Posts
Recent Comments
Link
250x250
| 일 | 월 | 화 | 수 | 목 | 금 | 토 |
|---|---|---|---|---|---|---|
| 1 | ||||||
| 2 | 3 | 4 | 5 | 6 | 7 | 8 |
| 9 | 10 | 11 | 12 | 13 | 14 | 15 |
| 16 | 17 | 18 | 19 | 20 | 21 | 22 |
| 23 | 24 | 25 | 26 | 27 | 28 | 29 |
| 30 |
Tags
- 리플
- btc
- 솔라나
- 마이봇#아이폰#아이폰심사#IT고시#
- 광동온더그린#프랜즈#가상CC#스크린골프#
- #비트코인 #암호화폐 #코인투자 #가상화폐 #이더리움 #알트코인 #코인뉴스 #투자전략 #코벡스 #코인계산기
- 마이봇#chatgpt#ai#인공지능
- Sol
- 마이봇#문서챗봇#PDF#TEXT#유투브#챗봇만들기#랭체인# langchain#벡터데이터#자료검색#챗GPT#GPT4#챗지피티
- 마이봇#핸드폰대체#
- PDF#챗봇검색#서비스#GPT4#PGT3.5#GPT#랭체인#챗봇#CHATBOT#LLM#문서검색
- #창작#SNS#스포츠#반려동물#연애#과제#레시피#활동#건강#운세#글쓰기#비즈니스 #AI비서#챗GPT#CHATGPT
- 플러터#sms#mms#문자보내기
- 비트코인
- 도지코인
- flutter#채팅창@메모창#url링크#날짜추가
- 로우코드#ERP#관리시스템#상품관리#선택박스#자동화프로그램
- xrp
- 이더리움
- flutter#sqlite#chatGPT#
- doge
- 마이봇#pdf챗봇#상담챗봇#faq챗봇#chatgpt#랭체인#llm
- 펫버틀러#서버연동#프로필등록#로그인서버연동#이미지#동영상#업로드용 화면#앱개발#플러터#반려생활#로딩바#loading bar#
- eth
- 쇼핑몰관리시스템#매입관리#시트메타#매입채널#엑셀업로드
- 로우코드#lowcode#erp#관리시스템#시트메이트#시트메타#엑셀업로드#엑셀다운로드#그리드#데이터관리#생산관리시스템#로그관리#히스토리#입력체크
- 11만4천 달러
- 마이봇#API 설정
- PDF검색#PDF검색챗봇#NEXTJS#스터디#스타트업#랭체이#langchain#prisma#sqlite#
- 커피#그라인더#통돌이 오픈 #로스팅#드립커피#생두#원두
Archives
- Today
- Total
혼자서 앱 만드는 개발자 함께하는 AI 세상
디버그 모드로 서명한 APK 또는 Android App Bundle을 키를 생성 하고 Release 변경 하기 본문
반응형
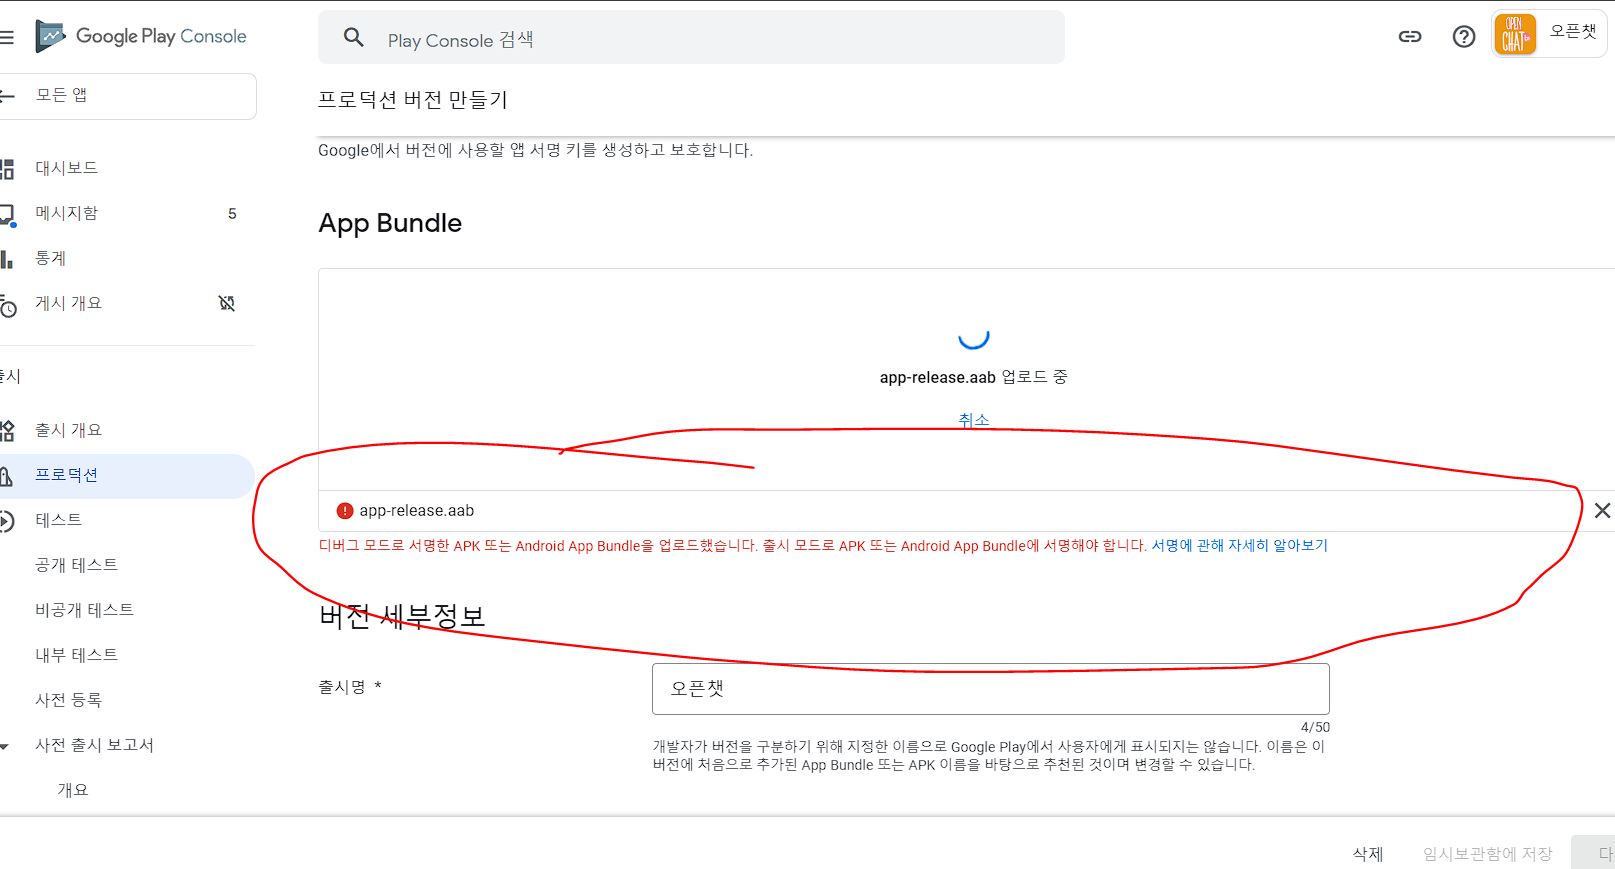
- 앱출시할대 늘빼먹고 있어서 당황할때가 많다 그중에 디버그모드를 릴리지 모드로 전환하는것이다.
- 아래 와같이 문구가 나오면 당황하지 말고 수정해서 다시올려보자
- 디버그 모드로 서명한 APK 또는 Android App Bundle을 업로드했습니다. 출시 모드로 APK 또는 Android App Bundle에 서명해야 합니다. 서명에 관해 자세히 알아보기


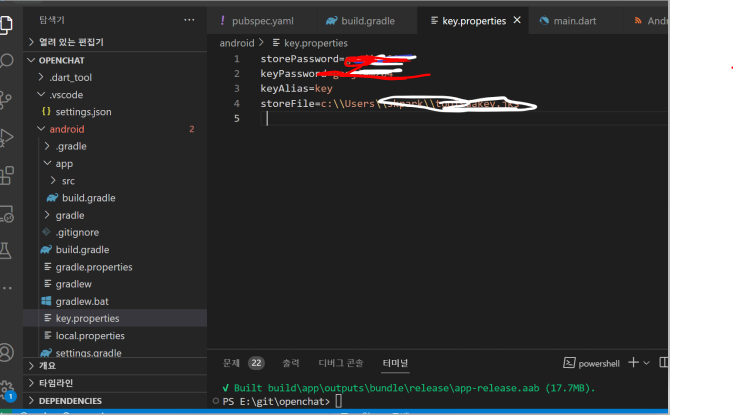
key.properties 파일을 만든다.
storePassword=xxxxxxxxxxx
keyPassword=xxxxxxxxxxx
keyAlias=key
storeFile=c:\\Users\\xxxx\\xxxxxakey.jks
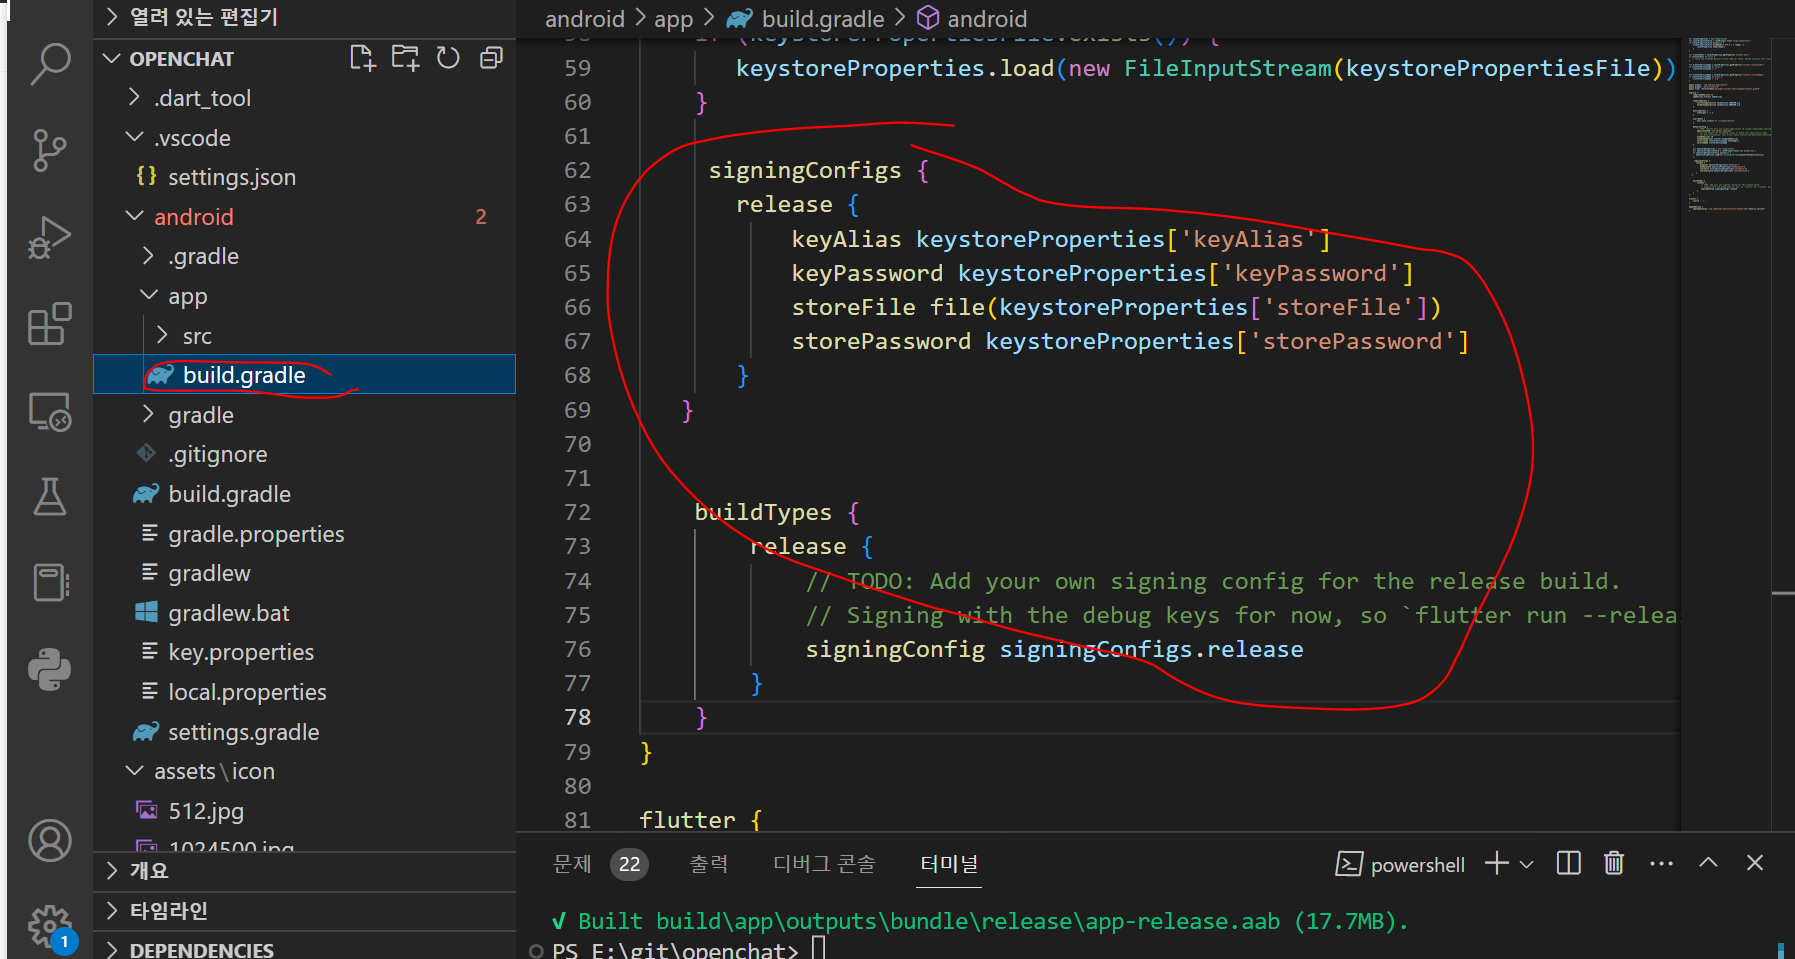
build.gradle 파일에서 아래 와같이 수정한다.

def localProperties = new Properties()
def localPropertiesFile = rootProject.file('local.properties')
if (localPropertiesFile.exists()) {
    localPropertiesFile.withReader('UTF-8') { reader ->
        localProperties.load(reader)
    }
}

def flutterRoot = localProperties.getProperty('flutter.sdk')
if (flutterRoot == null) {
   // throw new GradleException("Flutter SDK not found. Define location with flutter.sdk in the local.properties file.")
}

def flutterVersionCode = localProperties.getProperty('flutter.versionCode')
if (flutterVersionCode == null) {
    flutterVersionCode = '1'
}

def flutterVersionName = localProperties.getProperty('flutter.versionName')
if (flutterVersionName == null) {
    flutterVersionName = '1.0'
}

apply plugin: 'com.android.application'
apply plugin: 'kotlin-android'
apply from: "$flutterRoot/packages/flutter_tools/gradle/flutter.gradle"

android {
    compileSdkVersion 33
    ndkVersion flutter.ndkVersion

    compileOptions {
        sourceCompatibility JavaVersion.VERSION_1_8
        targetCompatibility JavaVersion.VERSION_1_8
    }

    kotlinOptions {
        jvmTarget = '1.8'
    }

    sourceSets {
        main.java.srcDirs += 'src/main/kotlin'
    }

    defaultConfig {
        // TODO: Specify your own unique Application ID (https://developer.android.com/studio/build/application-id.html).
        applicationId "com.shsoft.openchat"
        // You can update the following values to match your application needs.
        // For more information, see: https://docs.flutter.dev/deployment/android#reviewing-the-build-configuration.
        minSdkVersion 19
        targetSdkVersion flutter.targetSdkVersion
        versionCode flutterVersionCode.toInteger()
        versionName flutterVersionName
    }

    def keystoreProperties = new Properties()
    def keystorePropertiesFile = rootProject.file('key.properties')
    if (keystorePropertiesFile.exists()) {
       keystoreProperties.load(new FileInputStream(keystorePropertiesFile))
    }

     signingConfigs {
       release {
           keyAlias keystoreProperties['keyAlias']
           keyPassword keystoreProperties['keyPassword']
           storeFile file(keystoreProperties['storeFile'])
           storePassword keystoreProperties['storePassword']
       }
   }


    buildTypes {
        release {
            // TODO: Add your own signing config for the release build.
            // Signing with the debug keys for now, so `flutter run --release` works.
            signingConfig signingConfigs.release
        }
    }
}

flutter {
    source '../..'
}

dependencies {
    implementation "org.jetbrains.kotlin:kotlin-stdlib-jdk7:$kotlin_version"
}- 그리고
-
flutter build appbundle 실행해서 다시 빌드해서 올리면 문제없이 등록될것이다.
- 암호화키 keytool을 이용한 jks 파일 제작은 구글링하면 금방 찾을수있다.
- 인증서 생성(keytool설치후) keytool -genkeypair -keystore jks_keystore -storetype jks 인증서 출력 keytool -list -keystore my-keystore.jks
keytool -genkey -v -keystore legalbot.jks -keyalg RSA -keysize 2048 -validity 1000000 -alias legalbot
- 페스트워드 없이 등록하면 바로 보여준다. 아래 SHA-256 코드로 firebase에 서명키로 등록하면된다.

728x90
반응형
'플러터 앱개발' 카테고리의 다른 글
| 플러터 firebase 아이폰 로그인 적용 (0) | 2023.04.08 |
|---|---|
| 플러터 최근 업데이트 문제로 클립보드 paste copy 복사 붙여넣기 기능에 작동을 안한다 (1) | 2023.02.28 |
| [플러터앱개발] flutter GOOLGE NOTIFICATION ICON 만들기 (0) | 2022.12.17 |
| [플러터앱개발] 플러터 firebase 구글 로그인 페이지적용 (0) | 2022.12.16 |
| [플러터앱개발]구글플레이 firebase 연결설정 (0) | 2022.12.13 |
Comments


