| 일 | 월 | 화 | 수 | 목 | 금 | 토 |
|---|---|---|---|---|---|---|
| 1 | ||||||
| 2 | 3 | 4 | 5 | 6 | 7 | 8 |
| 9 | 10 | 11 | 12 | 13 | 14 | 15 |
| 16 | 17 | 18 | 19 | 20 | 21 | 22 |
| 23 | 24 | 25 | 26 | 27 | 28 | 29 |
| 30 |
- 이더리움
- 마이봇#API 설정
- 플러터#sms#mms#문자보내기
- Sol
- 로우코드#lowcode#erp#관리시스템#시트메이트#시트메타#엑셀업로드#엑셀다운로드#그리드#데이터관리#생산관리시스템#로그관리#히스토리#입력체크
- 비트코인
- 솔라나
- 로우코드#ERP#관리시스템#상품관리#선택박스#자동화프로그램
- 커피#그라인더#통돌이 오픈 #로스팅#드립커피#생두#원두
- PDF#챗봇검색#서비스#GPT4#PGT3.5#GPT#랭체인#챗봇#CHATBOT#LLM#문서검색
- 광동온더그린#프랜즈#가상CC#스크린골프#
- 쇼핑몰관리시스템#매입관리#시트메타#매입채널#엑셀업로드
- 도지코인
- 마이봇#pdf챗봇#상담챗봇#faq챗봇#chatgpt#랭체인#llm
- eth
- btc
- 리플
- doge
- PDF검색#PDF검색챗봇#NEXTJS#스터디#스타트업#랭체이#langchain#prisma#sqlite#
- 마이봇#chatgpt#ai#인공지능
- xrp
- flutter#sqlite#chatGPT#
- 11만4천 달러
- #비트코인 #암호화폐 #코인투자 #가상화폐 #이더리움 #알트코인 #코인뉴스 #투자전략 #코벡스 #코인계산기
- 마이봇#아이폰#아이폰심사#IT고시#
- #창작#SNS#스포츠#반려동물#연애#과제#레시피#활동#건강#운세#글쓰기#비즈니스 #AI비서#챗GPT#CHATGPT
- 마이봇#문서챗봇#PDF#TEXT#유투브#챗봇만들기#랭체인# langchain#벡터데이터#자료검색#챗GPT#GPT4#챗지피티
- 마이봇#핸드폰대체#
- flutter#채팅창@메모창#url링크#날짜추가
- 펫버틀러#서버연동#프로필등록#로그인서버연동#이미지#동영상#업로드용 화면#앱개발#플러터#반려생활#로딩바#loading bar#
- Today
- Total
혼자서 앱 만드는 개발자 함께하는 AI 세상
우분투 서버 Let's Encrypt : https://letsencrypt.org ssl 무료인증서 받아오기 본문
우분투 서버 Let's Encrypt : https://letsencrypt.org ssl 무료인증서 받아오기
혼앱사 2023. 8. 6. 17:48
# apt-get install letsencrypt인증서 설치를 위한준비 (모든 작업은 우분트 2.0 기준)
1, 도메인 등록
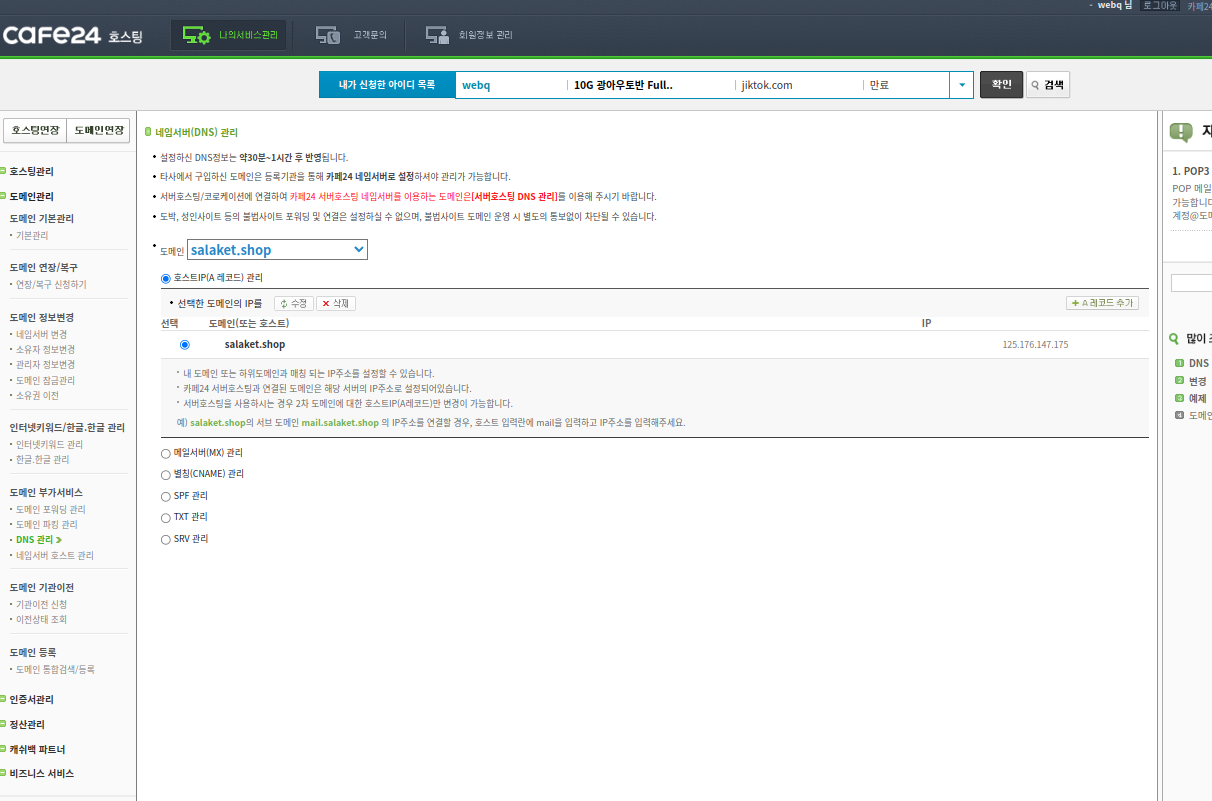
저의경우 테스트용으로 cafe24 550원에 세일중인 .shop 으로 구매했다. 자판기 커피한잔 값으로 일단 테스트 해보기로
https://hosting.cafe24.com/?controller=new_domain_search
카페24 호스팅 | 온라인 비즈니스의 시작
46,750원/1년 550원/1년
hosting.cafe24.com
도메인만 등록하는게 아니라 집에서 로컬피시를 사용할려면


만들고나면 해당하는 자신의 아이피를 A 레코드에 등록해준다. 도멘이관련은 궁금하신분들은 따로 문의 바래요
자신의 ip를 모르면 ip https://ip.pe.kr/ 여기서 확인가능하다.
2. 도메인 등록이 잘끝났으면 이젠 우분투에서 아파치를 설치해준다. 아래 자세하게 나온다.
https://seonghyuk.tistory.com/41
1. 우분투에서 아파치 웹서버 설치하기
[환경:ubuntu20.04 LTS] [1.아파치 서버 설치하기] $ sudo apt-get update $ sudo apt-get install apache2 계속 설치하겠냐고 메시지가 뜨면 y를 누르고 계속 진행합니다. *etc/init.d 라는 디렉토리는 daemon 프로그램들
seonghyuk.tistory.com
3. 아파치를 설치했으면 아파치 환견에서 home 디렉토리를 확인한다. 저의 경우 /var/www/html 로 설정되어있다.
apche2.conf 파일을 뒤지다 보며 확인 가능하다.
/etc/apache2/
|-- apache2.conf
|       `--  ports.conf
|-- mods-enabled
|       |-- *.load
|       `-- *.conf
|-- conf-enabled
|       `-- *.conf
|-- sites-enabled
|       `-- *.conf
3. 그럼 다시 Let's Encrypt : https://letsencrypt.org 설치하는걸로
https://blog.lael.be/post/5107
[Ubuntu] Let’s Encrypt 를 사용하여 무료로 SSL 사이트를 구축하는 방법
웹은 계속 발전하고 있으며, 여러 새로운 기술이 끊임 없이 등장하고 있다. 이 글에서는 웹 기술 중 하나인 SSL (Secure Socket Layer) 에 대해서 이야기 해 보고자 한다. < 그림 : OSI Model 에서 SSL 의 위
blog.lael.be
# apt-get install letsencrypt설치후 이걸 실행시켜주면적용된다.
letsencrypt certonly --webroot --webroot-path=/var/www/html -d salaket.shop(각자구입한도메인)
결과

대충 선공한것같다....
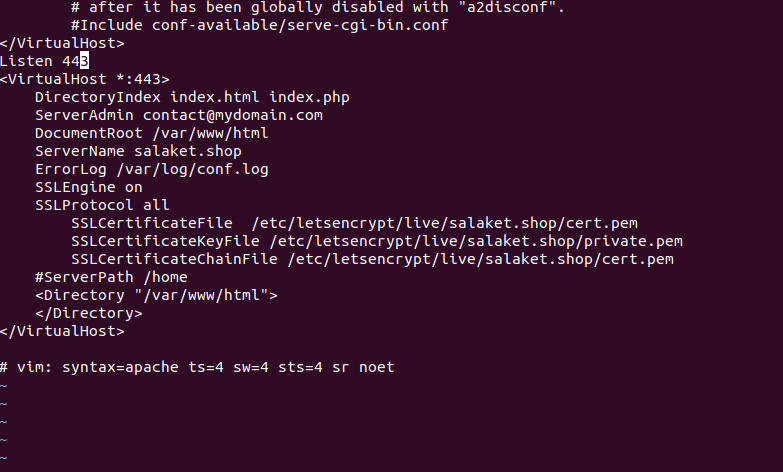
apche ssl 설정

Listen 443 => 이건 필요없는것 같음
<VirtualHost *:443>
DirectoryIndex index.html index.php
ServerAdmin contact@mydomain.com
DocumentRoot /var/www/html
ServerName salaket.shop
ErrorLog /var/log/conf.log
SSLEngine on
SSLProtocol all
SSLCertificateFile /etc/letsencrypt/live/salaket.shop/cert.pem
SSLCertificateKeyFile /etc/letsencrypt/live/salaket.shop/private.pem
SSLCertificateChainFile /etc/letsencrypt/live/salaket.shop/cert.pem
#ServerPath /home
<Directory "/var/www/html">
</Directory>
</VirtualHost>
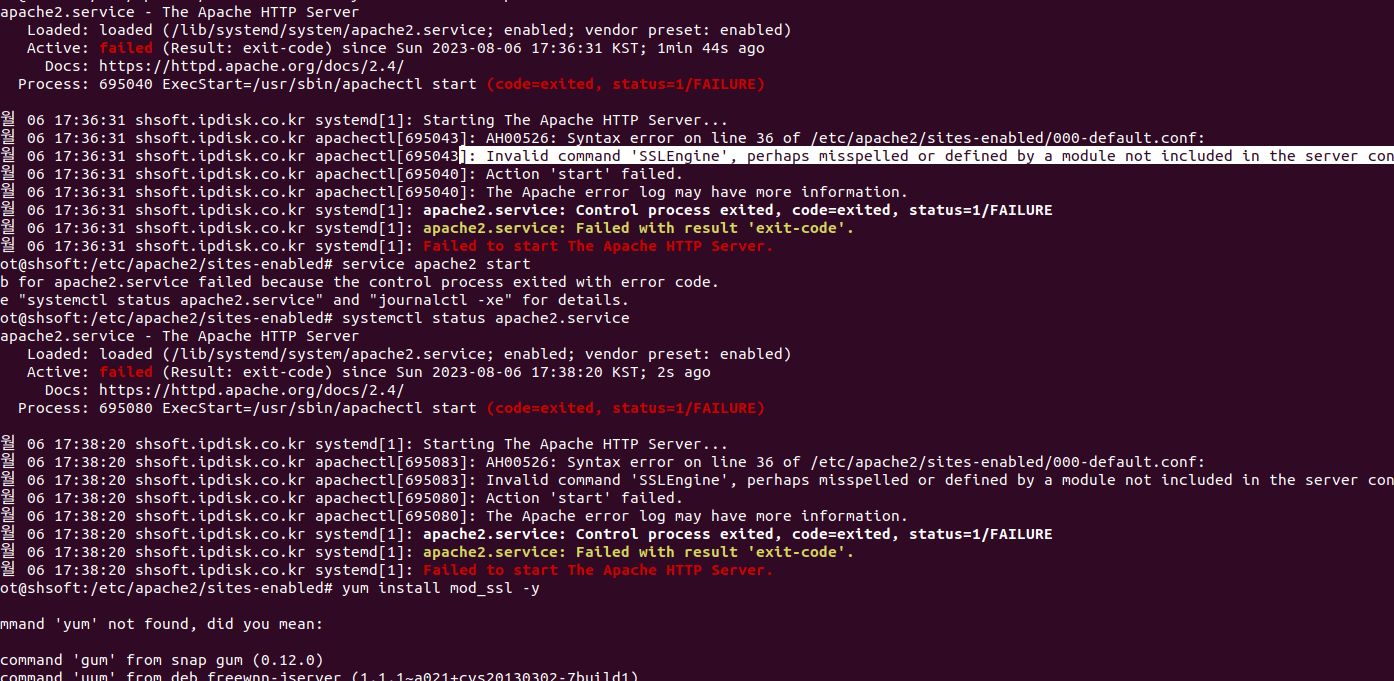
수정후 아파치 재실행하니 모듈이 안깔렸다고 나옴

관련 검색을통해 모듈설치하고 재실행아니까 에러없이 잘적용되네요
https://webdir.tistory.com/228
[Ubuntu] 우분투 Apache(아파치) SSL 적용
HTTPS로 시작하는 보안이 강화된 HTTP를 보신적이 있을 겁니다. 국내보다는 국외에서 활발히 사용되고 있는 실정입니다. 관련하여 자세한 이론적인 설명은 아래의 링크들로 대체합니다. http://opentu
webdir.tistory.com
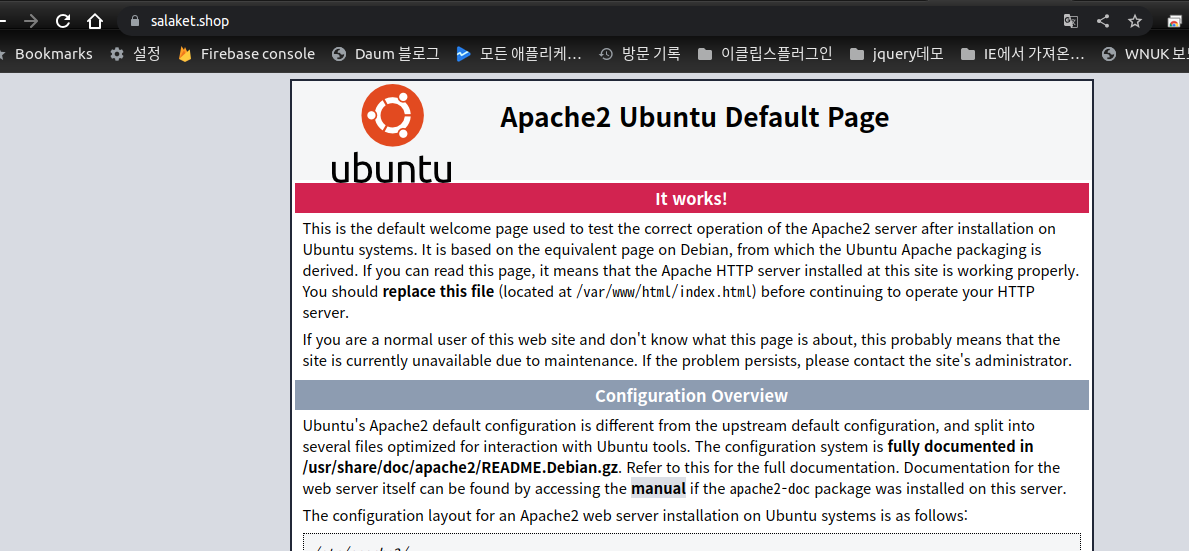
위에 자물세 키가 정상적으로나옵니다.

마지막으로 nextjs를 아피치에 연동할지 아님 자체 nextjs 적용할지 고민입니다. ^^
apache 를 proxy 로 연결해본다.
<VirtualHost *:80>
        # The ServerName directive sets the request scheme, hostname and port that
        # the server uses to identify itself. This is used when creating
        # redirection URLs. In the context of virtual hosts, the ServerName
        # specifies what hostname must appear in the request's Host: header to
        # match this virtual host. For the default virtual host (this file) this
        # value is not decisive as it is used as a last resort host regardless.
        # However, you must set it for any further virtual host explicitly.
        ServerName salaket.shop

        ServerAdmin webmaster@localhost
        DocumentRoot /var/www/html
        Redirect / https://salaket.shop
        # Available loglevels: trace8, ..., trace1, debug, info, notice, warn,
        # error, crit, alert, emerg.
        # It is also possible to configure the loglevel for particular
        # modules, e.g.
        #LogLevel info ssl:warn

        ErrorLog ${APACHE_LOG_DIR}/error.log
        CustomLog ${APACHE_LOG_DIR}/access.log combined

        # For most configuration files from conf-available/, which are
        # enabled or disabled at a global level, it is possible to
        # include a line for only one particular virtual host. For example the
        # following line enables the CGI configuration for this host only
        # after it has been globally disabled with "a2disconf".
        #Include conf-available/serve-cgi-bin.conf

</VirtualHost>
<VirtualHost *:443>
    DirectoryIndex index.html index.php
    ServerAdmin contact@mydomain.com
    DocumentRoot /var/www/html
    ServerName salaket.shop
    ProxyPass / http://0.0.0.0:3001/
    ProxyPassReverse / http://0.0.0.0:3001/
    ErrorLog /var/log/conf.log
    SSLEngine on
        SSLProtocol all -SSLv2 -SSLv3
        SSLCipherSuite HIGH:MEDIUM:!SSLv2:!PSK:!SRP:!ADH:!AECDH
        SSLCertificateFile /etc/letsencrypt/live/salaket.shop/cert.pem
        SSLCertificateKeyFile /etc/letsencrypt/live/salaket.shop/privkey.pem
        SSLCACertificateFile  /etc/letsencrypt/live/salaket.shop/chain.pem
    #ServerPath /home
    <Directory "/var/www/html">
    </Directory>
https://aterilio.tistory.com/60
프록시 서버 설정 시 Error : Invalid command 'ProxyPass'
Apache 가 웹서버,Tomcat 이 WAS 일 때 Apache 가 Tomcat 의 앞단에서 프록시 역할을 하려면 site-available/000-default.conf 파일의 내부에ProxyPass / http://localhost:8080/ProxyPassReverse / http://localhost:8080/ProxyVia on 위와
aterilio.tistory.com
프럭시 설정시
Invalid command 'ProxyPass', perhaps misspelled or defined by a module not included in the server configuratio
발생해서 위에 블러그 내용되로

조치하고 restart
sudo service apache2 restart
https://salaket.shop/login 화면으로 잘 연결된다.
'nextjs 랭체인 챗봇만들기' 카테고리의 다른 글
| nextjs 서비스를 위한 빌드 스타트 build start 아파치 연동 (0) | 2023.08.10 |
|---|---|
| Purple Admin UI 적용해보기 sqlite 적용해보기 ... 작성중 (0) | 2023.08.06 |
| PDF 검색 챗봇 / Next.js 에서 TypeScript + sqlite 사용을 위한 Prisma (0) | 2023.08.06 |
| Next.js에서 Langchain 문서 로더를 사용할 때 'fs 모듈을 찾을 수 없음' 오류를 수정하는 방법은 무엇입니까? (1) | 2023.08.03 |
| Next.Js로 파일 업로더를 구축하는 방법 (2) | 2023.08.02 |


